Multiprog
(XL) programmers
Manufactured
in Germany, these programmers are quite excellent! They have a lucious LCD
display, giving you all sorts of information about what your programmer is
doing and what is being programmed.
It looks
splendid, although quality and price ratio should not be out of the ordinary,
it's price is high,
but let me
say that this programmer worth every penny.
FEATURES
 2
fast AVR RISC controller with about 7 Mips on board
2
fast AVR RISC controller with about 7 Mips on board
Update
of Bios via serial interface
large
PLD unit, update possible by software
programable
clock generator
LCD
display for showing functional mode in clear text
all
wires of the serial interface available
4
buttons for switching functional mode and reset
5
LED indicating mode and data stream
Smartcard
slot for all usual cards with ISO standard
DIP
socket for programing of PIC/AVR controller + EEPROMs
Emulation
mode:
Mouse
mode with 3,5 and 6 MHz clock
PICPROG
mode, LudiPipo compatible
SPI/AVR
mode, for programming of Atmel
Easy-Check-Mode
for GSM cards, telephone cards, health insurance scheme cards and banking
cards
Twoprog
mode, simple treatment of goldwafer cards
new
programmer with illumination display
TwoProg
2.3 programming software
SUPPORTING
CARDS
Twostone-Card
with PIC16F84 and EEPROM 24C16
Twostone-Card
with PIC16F84 and EEPROM 24C64/65
Wafercard
Gold with PIC16F84 and EEPROM 24C16
AVR-Card
with ATMEL AT90S8515
AVR-Card
with ATMEL AT90S8535
AVR-Card
with ATMEL AT90S2323
AVR-Card
with ATMEL AT90S2343
Piccard2
with PIC 16F876 and EEprom 24LC64/65
Multiprog
2001XL General Info.
6
emulations in one programming device
- mouse mode,
compatible to Multimouse, Smartmouse, Dumpmouse etc., clock frequency 3,5 and
6 MHz, reset inverted and not inverted, perfect reset timing.
- PIC
Programmer, compatible to Ludipipo and JDM programmer; works on each serial
interface, programming voltage by integrated Voltage Generator.
- I²C
programmer, for programming of I²C EEPROMs of Twostone-PIC and wafer card.
- SPI
programmer, for Twostone-AVR, Yupiter card, FUN card and AVR chip from ATMEL®
- Easy-check
emulation for processing of telephone cards, health insurance scheme cards,
GSM cards and money cards.
- TWOPROG,
the simle to handle programming tool works together with MP2001XL without
problem
Features:
Changeover of
functions by 3 buttons (+ reset button).
Changing over
logic in PLD circuit.
Run by fast
AVR RISC controller.
Update of
controller BIOS possible via serial interface.
Update of PLD
circuit possible by software.
LCD display
with 14 digit shows present operation mode in clear text.
5 LED for
functional and data flow check.
Clock
frequency free programmable by PLL circuit.
No jumpers
required for configuration.
Internal
generation of programming voltage, therefore power supply from 7,5V is
sufficient.
Soft handling
of cards by shunt resistors and voltage switch off.
Available
standard software can be used.
DIP socket
for programming of PIC and AVR controller as well as serial EEPROMs.
Power
supply:
Multiprog
Quadro requires a simple, nonstabilized 300mA universal mains plug power
supply. Set the voltage of power supply to 7,5V or 9V. If you take a
stabilized power supply, please set voltage to 9V. Moltiprog 2001XL is
protected against wrong poled voltage. The plus pole should be in the center
of the coaxial plug.
The runing
voltage controller (IC1) gets warm, that is normal. Please do not set the
input voltage to high, since voltage controller gets to hot then. The required
PIC programming voltage of 12V is gererated on MP2001XL by a voltage cascade.
Therefore in difference to elder programmers such high power supply voltage is
not required.
RS232
cable:
Please use a
1:1 connected RS232 prolonging cable, but no Nullmodem cable.
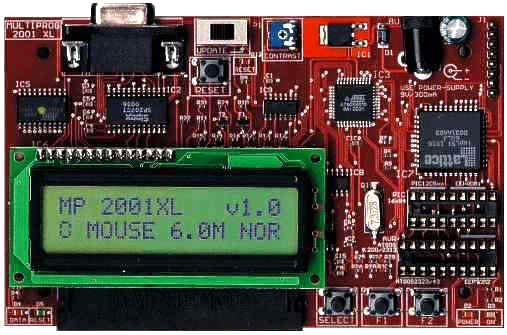
Buttons:
Right to the
card slot there are three buttons for the operation mode, what are labeled
with “SELECT”, “F1” and “F2”. By “SELECT” the emolation gets
changed, “F1” and “F2” change parameters depending on the chosen
emulation.
On the
backside besides the RS232 connect you find the RESET button, what mainly is
needed for software development. In normal mode MP2001XL will be set to
default by pressing this button. During programming procedure these button
must never get pressed, since you could destroy the pluged in card or the
connected DIL chip. When you press the RESET button the RESET LED will light
up.
BIOS and
PLD update:
Should
be nessesary an update of the BIOS or PLD chip, you will find it on the
homepage of www.multisat.de and www.2stone.de
. Have a look at these web pages from time to time, if
there is something new for your Multiprog2001XL.
The DIP
programming sockets:
PIC-, AVR
controller and EEPROMs in DIP format you can program via DIL sockets.
The 18 pin
socket (PIC 16x84) is designed for the controller 16C84, 16F84 and 16F84A. The
programming runs in “PICPROG” mode with IC-Prog or Ponyprog. In
“TWOPROG” mode the controller can get programmed also with TWOPROG2.2b
software.
For the
programming of PIC16C508 or 16C509 please plug the chip to the marked place in
the 18 pin socket. The programming runs in “PICPROG” mode with IC-Prog or
Ponyprog.
I²C EEPROMs
24C01, 02, 04, 16, 32, 64, 65 please plug in the marked postion “EEPROM1”
in the 18 pin socket. The programming runs in “PICPROG” mode with IC-Prog
or Ponyprog. In the “TWOPROG” mode you can program EEPROMs only in the 20
pin socket “EEPROM2” by TWOPROG2.2b.
AVR
controller AT90S1200, 90S2313 get programmed in the 20 pin socket. The
programming runs in “AVR/SPI” mode with IC-Prog or Ponyprog.
AVR
controller AT90S2323, 90S2343 get programmed in the marked position in the 20
pin socket. The programming runs in “AVR/SPI” mode with IC-Prog or
Ponyprog.
You are
adviced to set the socket by F2 to mode “CARD” voltage free, before you
plug or pull a DIP chip for programming. Before you start the programming
software, switch the voltage on by F2 to “DIP” mode.
With
programms like ICProg or PonyProg the DIP EEPROMs get programmed in Pipo/JDM
mode. Set the EEPROM in the right position in the PIC socket (according to
print on board) and set mode “PICPROG”. The “I²C/EEP” mode is to set
only for programming of EEPROMs on Twostone/PIC cards.
5
emulation mode by SELECT button:
“0/1
MOUSE”, Multimouse/Smartmouse emulation
Button F1 =
select clock frequency between 6,0 MHz (mode 0) and 3,5 MHz (mode 1)
Button F2 =
select RESET between inverted “NOR” and not inverted “INV”
“2 PICPROG”,
Ludipipo/JDM emolation
Button F1 =
no function
Button F2 =
select between smartcard “CARD” and DIP programming “DIP”
“3 I²C/EEP”,
EEPROM on the Twostone/PIC card
Button F1 =
no function
Button F2 =
select between smartcard “CARD” and DIP programming “DIP”
“4 SPI/AVR”,
AVR/Twostone-Yupiter
Button F1 =
no function
Button F2 =
select between smartcard “CARD” and DIP programming “DIP”
“5
EASY-CHECK”, emulation for chip card reading program “EASY-CHECK”
Button F1 =
no function
Button F2 =
no function
The
Multiprog 2000 emulation mode:
That does
exist no longer. Therefore exists
TWOPROG mode
This mode
gets activated with programms of version 2.2b and higher. Therefore Multiprog
2001 XL must be set to Mouse mode (0 or 1) and no card must be pluged into the
slot.
Once Twoprog
started, the display will show “TWOPROG ---“.
In this mode
all functions of Twoprog can be used direct by MP2001XL. For the handling of
Twoprog please read the help file belonging to the program. When you quit
Twoprog, the MP2001XL goes to Mouse mode; should these not happen automaticaly,
the RESET button of the MP2001XL must get pressed.
DIP chips can
get programmed also in Twoprog mode. When “Insert Card” is shown, you can
press button F1 for start of programming procedure. EEPROMs must be pluged to
the on board marked position in the AVR socket (EEPROM2).
Contrast
setting:
Turn the
contrast controller counterclockwise, until the text on display can be read
clearly.
Serial
numbers:
Your
Multiprog 2001 XL has one unique serial number. You can disply the serial
number by holding “F1” and “F2” together and pressing the RESET button
(please only with empty card slot and empty DIL socket).
To avoid
damage of the Multiprog Quadro/2001 by static electricity, please pay
attention the following hints:
- Only touch
the board on the edge.
- Discharge
your body by touching some grounded metal (PC casing).